Sunday 14 August 2011

Big, fat breadsticks

Ingredients:
450g strong white bread flour (plus extra for dusting)
1 x 7g sachet fast action dried yeast
1 1/2 tsp salt
250-275ml warm water
vegetable oil or spray oil, for oiling
2 tbsp extra virgin olive oil
2 tbsp sea salt
2 tbsp freshly cracked black pepper
(alternatively: 2 tbsp poppy seeds, or sesame seeds, or marmite, etc)

 
  1. Dust two large baking trays with flour
  2. Put the flour, yeast and the salt into a TM bowl and add 250ml of water to start with. Kneed for 5 minutes/Mixtopf geschlossen/Teigstufe. Keep adding some more water until you create a soft but not sticky dough that cleaned the bowl.
  3. Devide the mixture into 10-12 portions each weighing about 60g (or 6-8 if you prefer bigger, fatter sticks). Roll the portions into balls, then place each ball on a floured surface and roll into a long sausage shape about 25cmx2cm


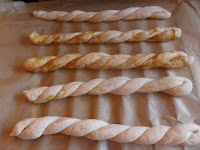
  1. I have shaped mine into twists. For this, run the knife down the centre to split the dough, leaving a bit at one end uncut. Braid or plait the two halves over each other to give a twisted effect.
  2. Place the breadsticks on the prepared baking trays, spacing them 4cm apart. Cover the breadsticks loosely with oiled clingfilm, making sure it's airtight. Leave in warm place for 30 minutes, or until the breadsticks have almost doubled in size.
  3. Preaheat the oven to 200C/400F/Gas 6.
  4. Remove the clingfilm and brush each breadstick with some extra virgin olive oil. Sprinkle with some sea salt and cracked pepper, or with poppy seeds, sesame seeeds, etc. Bake on the top third of the oven for about 20 minutes, or until the breadsticks are lightly golden-brown and feel firm to the touch. Remove them from the oven and leave to cool on the baking tray.
The Cooking Monster's Tip: For the Marmite breadsticks, I have drizzled the breadsticks with some marmite using a teaspoon, after cutting them in half, but before twisting them. That way you get the marmite in the middle as well.

Wednesday 27 July 2011

Life without the food? No thank you!

Sometimes I wonder what the life would be like if there was no food. I mean, we all have seen the films and cartoons set in the future, where the eating contained of swallowing a pill or two of different colours and that's it! There was no family gathering around the dinner table, no fancy restaurant dinners for two, no tea parties filled up with cream cakes and hot beverage, no take aways, no more pleasures for the taste buds, for the soul, for the people. Imagine.. No more hot stew on the stove, no more smell of freshly baked bread, no more cake decorating. Instead, we replace the quality of life as we know it with the convenience, speed and less washing up. And I tell you what.. I don't want to! For me the quality of life lays in the hot bowl of soup. In my mum's scramble eggs and my husband's chilli. In the cup of tea! So I have decided to prove them wrong doing by cooking something absolutely stunning for dinner this weekend. Three course meal with side dishes, starters and dessert. Something my mother would be proud of. And I'm going to sit my family around the dinning table for this. Not one of our usual Saturday meals, "lapping" in the front of the telly. Keep your fingers crossed. And sorry can't do it earlier than Saturday.. No time! :)


Here are some great treat ideas...

Double Chocolate Mousse Heaven

Very Berry Tart

Layered Chocolate Mousse

Ingredients:
150g good dark chocolate (I used Lindt's 90% cocoa)
150g milk chocolate (I used Dairy Milk)
2x 250g cream 35%
100g sugar
500g milk
2 tbsp liquid rennet

  1. Break the dark chocolate into a TM bowl, crush it by pressing a Turbo button a few times until fine crumbs. Weigh in 50g sugar, add 250g cream, 250g milk, add 1 tbsp liquid rennet. Cook together (7 minutes/90°C/Speed 5)
  2. Pour the chocolate into a bowl or silicone mould and leave in the fridge for couple of hours to chill and set.
  3. When the dark chocolate is set, prepare the milk layer. Crush white chocolate in TM bowl by pressing Turbo a few times. Add 50g sugar, 250g cream, 250 milk and 1 tbsp of liquid rennet. Cook for 7 minutes/90°C/Speed 5.
  4. Using a fork scratch the surface of the dark chocolate layer gently for better adhesiveness. Pour the milk mixture over and leave in the fridge to settle.
  5. You can add a white chocolate mousse if you wash by crushing 150g of white chocolate and cooking it for 7minutes/90°C/Speed 5 together with 250g cream, 250g milk and 1 tbsp of rennet (do not add any sugar at this stage). My favourite chocolate for this is Lindt's White chocolate with touch of vanilla.

Cooking Monster's Tip: You can convert this recipe into a double or triple layered chilled cheesecake, by adding more rennet, or gelatine instead (5 sheets per each layer). You can make a biscuit base first by crushing 200g biscuits (chocolate chip or digestives) in TM bowl by pressing Turbo a few times and mix it with 90g of melted butter.

Very Berry Tart.

Ingredients:

4 eggs
1 cup caster sugar
1 cup plain flour
1/2 tsp baking powder

Mixed berries or other fruit
Ready made thick custard
Whipped cream
Jelly of your choice (prepared with some water and set in the fridge to start setting)


  1. Heat up the oven 180°C/Gas mark 5. Butter and layer with some parchmin a tart baking tin with removable bottom.
  2. Insert a butterfly whisk into a TM bowl
  3. Add the eggs and butter to TM bowl (1 minute/Speed 3)
  4. Lower the Speed to 2 and whilst it's mixing keep adding the flour and baking powder spoon by spoon until all mixed well.
  5. Bake 20-25minut until golden brown.
  6. When cooled down, you can spoon out some of the cake from the middle to create a hole for the fruit.
  7. The way to decorate it it's entirely up to you. created the layers of custard, cream fruit, jelly, custard, cream, fruit, etc...
  8. You can sprinkle the top with some roasted pistachios nuts or dust with some icing sugar.
This recipe is also perfect for making a sponge cake cut in half, with some fruit and cream in between.

Enjoy!!

Saturday 2 July 2011

Ah, summer, what power you have to make us suffer and like it.

And so, after some miserable months and recent weeks of rain, we finally got it! A few hot summer days!! Lucky you out there who live in place where you have proper, hot, predictable summers. Here, in the UK, we are lucky if it doesn't rain at the weekend. And I always find this funny, that knowing this and living in those conditions all their lives, people here still act surprised when it rains ;-)


(Sorry if I sound all superior here, but if there's one thing English people know how to cope with, it's rain. Sure, those, so typically English green fields look pretty when you're looking out of the window of a plane, but once you've landed, you'll soon discover exactly WHY everything is so green. So while the slightest glimpse of sunshine sends the English folk into a frenzy of suntan lotions, rolled up trouser legs and lunchtime sunburns, it is the rain that we're really comfortable with.)
Anyway, last weekend was HOT! And you could immediately experience the beauty of a British summer at midday at Tesco - packed, instead of laying on the beach, everyone is queuing up at the tills, buying bags of ice-cubes, boxes of beer, gallons of lemonade and tons of suntan lotion bottles. Rushing through the supermarket aisles, quickly not to miss out on this glimpse of sunshine. To later enjoy it from the inside of their cars lined up from the parking to the exit and all the way to the beach. You know it's summer when it takes you more than an hour to get to the sea-front, the journey that normally takes you 10-15 minutes. 


Soon after you start hearing the typical noises of the British summer - kids laughing whilst they play in garden inflatable swimming pools (come on! who would waste money in the UK and invest in an outdoor pool, that they going to use for a few days of the year!?). You can smell the barbecued meat, the cling of beer, Pimm’s and lemonade glasses and most of all, you can really feel it - the summer is finally here. Good things happen to those who wait!

And so, on Saturday after sending off my little one with her dad to the Sea Life Centre in Brighton and cleaning the whole house, I have prepared the Biryani Chicken with Cucumber Raita, went shopping (yes, I was one of those, yet there's no beach for busy mums), Sunday prepared the bread dough for the burger rolls, the homemade burgers, and cool fruit salad with some minted sugar.

And thinking I'm going to rest on Monday, I have unexpectedly ended up hosting 3 hungry kids and their mums over for a lunch in my garden. Quick.. quick.. What should we have? Oh, my best friend, my saviour, my darling Thermie - thank you for helping me :) Together, in few minutes we had a "Cheater's Pizza" in the oven, cold lemonade in a jar and some fruit coctails for the kids. And the sandpit, inflatable swimming pool, pop up train-shaped tents for the kids, the parasol on, and in a lovely company I have spend my last (for a while at least) free Monday, before I go back to work full time next week (for 2 days only before I board a silver plane and take off on holidays, that is!!)


Wednesday 29 June 2011

Fruit Coctails

Ingredients:

250g frozen fruit of your choice (we used some raspberries and forest fruit mix)
2 frozen bananas (I always keep some in the freezer for the emergency gellato fix)
100g ice cubes
fresh milk or ice-cream if you prefer

We didn't use any sugar, but if you wish, you can add some.
1. Weigh in the sugar (if using) into TM bowl and grind for 5seconds/Speed 8

2. Add all remaining ingredients  Mix 30seconds/Speed 10.

Cooking Monster's Tip: Depending on the amount of ice-cubes and bananas you need to add as much milk as needed to create the consistency you want. Therefore add a little bit to the mix to start with and after checking the thickness of the coctail, add more and mix another few seconds/ Speed 10.

Lemonade

Ingredients:

2-3 lemons, skin on, washed, cut in halves
1000g water
100g sugar
10 ice cubes

1. Add the lemons, water and sugar to the TM bowl. Insert the TM cup and hold it. Setting: Mixtopf geschlossen/Turbo/2 seconds. Taste and add more sugar if desired.

2. Insert the steaming basket, hold it in place using the spatula. Pour the lemonade into a jar, add the ice cubes.

Tuesday 28 June 2011

Cheater's Pizza

This is a recipe for an almost effortless dough, that does not need any time to raise and it's ready within minutes for a quick and delicious snack or meal.

Ingredients:

350g plain flour
180g warm water
20g fresh yeast or 10g instant yeast
25g olive oil or grape seed oil
1 tsp salt
1/2 tsp sugar
1 egg

favourite pizza ingredients, i.e.: jarred tomato ragu or sauce, spicy if you wish, or 1 tin of chopped tomatoes (you can blend them in TM for few seconds/Speed 4-5 with some favourite seasoning); cheese - if you don't have already shredded one, chop it in TM bowl before preparing the tomato sauce by dropping the chunks of cheese onto the running blades at Speed 4-5 for 2-3 seconds, or until it has a desirable texture. You can use fresh tomatoes, ham, sausage (I used some of yesterday's BBQ burgers chopped), vegetables, olives, onion - whatever you fancy!

Prepare the dough (now this is really that easy!):

1. Weigh the flour, water, yeast, oil, salt, sugar and egg into the TM bowl and kneed (2 minutes / Closed Lid / Dough Setting). DONE!

2. Preheat to oven to 180°C/Gas 4. Line a pizza baking tray with some baking paper (I use a round one with lots of holes in it, so that the heat can get through from underneath cooking the dough quicker)

3. Drop the dough from TM bowl directly onto the baking tray, sprinkle it a little bit with some flour so that is easier to work with, make a ball, flatten it and stretch with your hands over the whole tray. Or divide the dough between 2 smaller trays if you are making more than one type of pizza. You will see how easily the dough will stretch and it will be very playable.

4. Cover the pizza dough with the tomato sauce, sprinkle  with the cheese and as many or as little ingredients as you desire.

5. Bake 20-25 minutes in 180°C/Gas 4

Monday 27 June 2011

Mad about Madeleines

These tiny shell-shaped cakes have been around in France since the early 18th century. They originate from the Lorraine region of northern France. Their shape comes from the shell-shaped mould in which the batter is cooked, but why they are called madeleines is a mystery. They may have been named by Louis XV in 1755 after Madeleine Paulmier, pastry chef to his father-in-law, Stanislaw Leszczynski, King of Poland and Duke of Lorraine (being Polish myself, I quite like this idea ;-) ).


The special texture of a madeleine comes from the fine Genoise sponge from which it is made. The light intensity of Genoise comes from the way in which the eggs and sugar are whisked together over a gentle heat until they have tripled in volume. Only then is the flour - which is sifted three times to incorporate as much air as possible - folded in and finally, the butter, melted and cooled, is gently trickled down the side of the bowl and carefully stirred in. Madeleines should be cooked as soon as the mixture is ready.


Ingredients

For the basic madeleine mixture:

125g unsalted butter
125g plain flour
1 level tbsp cornflour
4 eggs
125g caster sugar
1 tsp vanilla extract or orange flower water

For the variations:

strong black coffee
cocoa powder
desiccated coconut
lemon, orange or mix candied peel, finely chopped
finely chopped hazelnuts
orange or lemon zest
icing sugar, sifted, for dusting

Equipment:

Madeleine baking  tray (metal or silicone)


1. Preheat the oven to 190°C/375°F/Gas 5. Boil some water in a kettle. Melt the butter in a small pan over a low heat. Set aside to cool. Sift the flour and cornflour twice in a separate bowl.

2. Put the eggs, sugar and vanilla or orange water in a large heatproof bowl. Set a pan on a very low heat with some boiled water and let it simmer gently. Put the bowl on the top of it and using an electric whisk, whisk for a few minutes, until it is thick, pale and tripled in volume. It should leave a thick trail as it drops off the whisk.

The Cooking Monster's Tip: Do not rush this stage. Getting the egg mixture into a right consistency is vital for this recipe. The lightness and softness of the madeleines depends on this.

3. Remove the bowl from the heat and continue to whisk for a minute or two until the mixture is cool. Sift the flour (again) in an even layer into the egg mix , and gently fold it into the batter. When it is nearly blended, pour the cooled melted butter down one side of the bowl and blend that in too.

4. Fill each madeleine hole with the mix. Spoon a 1 TB of batter into each depression in the madeleine mold; don't smooth it out, the batter will spread when baking. (Personally, I think letting the batter spread itself assists in creating the characteristic "hump" on the back) and bake 10-12 minutes until springy and golden. Allow them to cool a bit before turning them out. Clean the tray for the next batch.

Unless you are lucky enough to own a madeleines tray of more than 9 holes (or more than one tray!), you would need to wait until then to bake the next batch. Therefore, make sure the bowl with remaining batter is covered with clingfilm and left in a cool shady place. Mix it gently with a wooden spoon well before using again, and now it's the time to come up with some variations! Devide the remaining batter between separate bowls (as many, as planned variations), and so...

  • For the coffee ones: Make some strong coffee and add a little to a batter. If you give the mixture only one spoon turn, it will create nice marble effect. Otherwise mix it up a little and gently with the spoon.
  • For the chocolate : Add a sifted tablespoon of cocoa powder and gently fold into the batter
  • For the coconut : Use some coconut shavings, as many as you like. I used couple of tablespoons at a small portion of batter (made 5)
  • For the Tutti-Frutti :  Add chopped candied peel, cherries, nuts or zest as you wish to the mixture
Bake as before. Cool the madeleines on a rack before arranging them a serving plate. You can sprinkle the vanilla and chocolate ones with some icing sugar. It will enhance their pretty shell shape.

And these are MINE!

Saturday 25 June 2011

Chicken Biryani

It is advisable to prepare the chicken and yogurt mixture 2-3 hours before the cooking and marinade it in the fridge. I have, however, skipped this and cooked it straight away and it worked well. So, if you are pressed for time, worry not, it will be delicious!

Ingredients:

small piece fresh ginger (thumb size)
2 cloves of garlic
1 tbsp Garam Masala
1 tsp chilli powder
2 tsp salt
5 green cardamon pods, bruised
300 ml natural yogurt, thick Greek style
1 chicken, weighing 1.5kg or 800-1000g chicken fillets
150 ml milk
1 1/2 tsp saffron strands
6 tbsp ghee
2 onions, peeled and sliced into thin half moons
450g basmati rice
2 cinnamon sticks
4 fresh green chillies or mix of medium red and green chillies
2 tbsp fresh coriander leaves
4 tbsp lemon juice


1. Put the full kettle on.

2. Add ginger cut in quarters, garlic, Garam Masala, chilli powder and half the salt  into TM bowl, chop on Speed 6-7 around 3-4 seconds

3. Add the cardamon pods and natural yogurt and mix together on Speed Spoon / Reverse Blades

4. While this is mixing, prepare the chicken.

If using the whole chicken, skin the chicken and cut into 8 pieces.

If using the chicken fillets, cut them into large cubes.

5. Mix the chicken with the yogurt mixture.

If using the chicken pieces, put them into a large bowl, pour the yogurt over and mix well. If using the fillets (like me), you can add them straight into the TM bowl and leave it for a minute or two mixing on Speed Spoon / Reverse Blades

6. Meanwhile, pour the milk into a small pan, bring it to boil. In a large pan heat up the ghee. A  third, medium pan, fill up with the water from the kettle, add the rice and cinnamon sticks and bring to boil. Then simmer for 4-5 minutes.

7. When the milk has boiled then take off the heat, sprinkle the saffron over it and set aside covered with a lid.

8. When the ghee is hot, add the onions and fry until golden. Mixing every so often.

9. Prepare a large pan for the whole curry dish. Drain the rice, pour it into a bowl and mix with the other half of the salt.

10. When the onions are ready, add half of them together with the ghee into the final dish pan. Pour all the chicken and yogurt over it, scraping the sides of the TM bowl with the spatula, as much as you can.

11. Put the TM bowl back on the TM base (no need to wash it!). Cut the chillies in halves and remove the seeds. Add them to the TM bowl and finely chop by pressing Turbo button a few times.

12. To the onions and chicken add: half of the chillies, half of the coriander leaves, half of the lemon juice and half of the saffron milk. No need to mix it, just scatter and pour them evenly all over the chicken. Add the whole rice (together with the cinnamon sticks) on the top of them. Then the rest of the ingredients, including the other half of the onions and the ghee.

Cover tightly with some kitchen foil, pressing gently down. Put the lid on and cook for an hour on a very low heat. Check that it's cooked through (the chicken pieces might take a bit longer), if needed extend the time by 15 minutes. Mix well before serving.

Serve with some natural yogurt on the side or a Cucumber Raita, sprinkle with some coriander leaves.

Cucumber Raita


Ingredients:

1 small cucumber
175g natural yogurt
1/4 tsp granulated sugar
1/4 tsp salt
1 tsp cumin seeds
10-12 black peppercorns
1/4 tsp paprika


1. Peel the cucumber and scoop out the seeds. Cut the flesh into bite-sized pieces and set aside.

2. Add the cumin seeds and peppercorns to the TM bowl, roast them for 3-5 minutes/Varoma Temperature/ Speed 1 until they release their aroma, then switch off and leave for few minutes to cool. Grind for 2-3 seconds on Speed 10 (with the TM cup on!)

3. Reserve 1/4 of the spices mixture and to the rest add the yogurt, salt and sugar. Mix together for 10-15 seconds / Speed Spoon

4. Add the cucumber, mix together for 10-15 seconds / Speed Spoon/ Reverse Blades.

5. Transfer the Raita into a serving dish and sprinkle with the reserved toasted spices and the paprika.

Friday 24 June 2011

The Mysterious Half and Half

To all the non-Americans out there who (like me!) were ever wondering what this mysterious ingredient is that they keep seeing in lots of American recipes. Simple enough, apparently. American "half-and-half" is a commercially prepared dairy product that is half whole milk and half cream. That's single cream, to all of Brits. If a recipe calls for one cup of half-and-half, use 1/2 cup whole milk and 1/2 cup single cream


And if you are wondering why I am posting this now, check this space shortly for some delicious American recipes to come! You may come across the Half and Half being used there, so stock up with some single cream.. You know, you want to!

Thursday 23 June 2011

From the diary of a busy mum...

Whilst juggling between my child, home, housework, studying, writing my dissertation project, writing the blog articles, work everyday, trips to and from the nursery, shopping, waiting for a bus, sleep, occasional eating, etc you could think there is nothing I cannot do. Typical woman. Unbreakable. Unstoppable. Until.. the sickness strikes again :( And so it happened..

There is the tummy bug going round at the moment, forced me into bed on Saturday night at 8.30pm, leaving my guests downstairs with my hubby and child (just as well I was prepared, and had the cake baked before and awaiting its time, and so they have not end up without a dessert! I have gone for a slightly altered by myself "Walnut and coffee cake", it has been a huge success.

The rest of the week I started feeling a bit better, however my poor hubby came down with the same symptoms and struggled. Just as I thought all is behind us, it came back! To me :( And so yesterday after picking up my daughter from the nursery after work and shopping, got home thinking I have to put a dinner on.. Now, what would be the last thing you would attempt to cook when you are busy looking after your child and feeling poorly?? A lasagne... You think straight away - time consuming, complicated, no way! But, thanks to my best friend in the kitchen, I have for the first time ever attempted it, and.. WOW!

All I had to do was to keep adding the ingredients to the bowl for pasta, put aside, added all ingredients for the meat sauce, boiled the kettle, and it was cooking it for me while I was playing with my Little Girl (30 minutes total). When my hubby came home and took the little one for a walk, I prepared the pasta sheets (also homemade!), the meat was ready and so I emptied the bowl, and put the cheese sauce on (6 minutes), whilst I was cooking my pasta. All I had to do later was to assemble the layers of perfectly cooked meat, thick and creamy cheese sauce, some grated mozzarella and pasta sheets. Topped it up with some cheddar slices, sprinkled with some hot chilli powder and into the oven for half an hour. All was left to do was to wash up - one TM bowl and couple of utensils! Perfect!


So, when my husband was ready for a dinner and discovered the lasagne in the oven, he said.. "I thought you were poorly..". Well, I was feeling a bit better, as I managed to serve him a lovely meal he deserves, seeing him going for the seconds, washing up done, child in bed and I could lay down on the sofa by 9pm and watch "The Apprentice"with a mug of a peppermint tea..


I will add the recipes for the lasagne, cheese sauce and homemade pasta for your convenience very soon, I promise! Until then please refer to your Thermomix Fast and Easy Cooking Cookbook.

Have a good day everybody!

Walnut and coffee cake

Ingredients:

5 tbsp instant coffee
350g caster sugar
3 vanilla pods or 3 tsp vanilla extract
240g shelled walnuts
240g ground almonds
380g unsalted butter, diced
5 eggs
100g plain flour
1 tsp baking powder
butter for greasing
cocoa powder for the tin


1. Grease and sprinkle with cocoa a 25cm tin and line the bottom with baking paper. in a cup dissolve the coffee with 2 tbsp boiling water. Mix it well making sure all has dissolved, you might need to put it into the microwave for a few secs and continue mixing.

2. Chop walnuts finely (7 seconds/Speed 5). Tip out and reserve.

3. Put the sugar and vanilla pods (if using) in the TM bowl, put the TM cup on and grind (25 seconds/Speed 10)

4. Add the butter, put the TM cup on and mix (5 minutes/Speed 7) until pale and light, stopping to scrape down the sides with the spatula 3 times, ending with scraping the sides.

5. Insert the Butterfly Whisk and with the blades running on Speed 4, drop the eggs one at the time through the hole in the TM lid, mixing until well blended after each addition.

6. Remove the Butterfly Whisk. Add the walnuts, almonds and dissolved coffee and vanilla extract (if using). Mix in at Speed 4.

7. Scrape the mixture into a large bowl. Fold in the flour mixed with the baking powder. Spoon into the tin and bake at 160°C/300°F/gas 3 for about 90 minutes.


The Cooking Monster's Tip: I have used a previously homemade butter from a 500ml double cream (refer to your Fast and Easy Cooking Cookbook recipe or look here). It is much softer and creamier and I believe this is what gives the cake such a moisture.

You will also notice (if you compare my recipe to the "Coffee, walnut and hazelnut cake" from the Fast and Easy Cooking Cookbook), that I have replaced the hazelnuts with almonds. Well, I believe that they add the moisture to the cake but don't over power with its taste. I thought the hazelnuts would of add an additional flavour to the walnuts, coffee and vanilla, that this cake doesn't need - yet it's a personal preference!

We have preferred to eat it as it comes out of the oven, pure sponge. However, if your are looking for something more special or a perfect celebration cake, then use this absolutely priceless "Coffee Buttercream" recipe that has been in my family for generations and has been passed on to me by my Grandmother. Feel free to use it!

For this, cool down the cake on the rack. Then cut it horizontally in half (or 3 layers if preferred). Spread some frosting using a pallett knife. Assemble, and cover either just the top or the top and the sides with the remaining frosting. You can also use some roughly chopped walnuts (walnut halves Turbo Pulse in TM bowl until required texture) and using your clean and dry hand, pat them gently to the frosting around the side of the cake. Then use some walnut halves to decorate the top.

Next time I will bake it with the frosting, I will show you my Grandmother's way to decorate the cake, you have probably never seen before! Watch this space :)

Enjoy!

My Nana's coffee buttercream

Ingredients:
30g fresh ground coffee
3 eggs
170g caster sugar
250g butter, soften
vanilla extract
1 shot glass of vodka or liqueur (clear not creamy, coffee or vanilla flavour, i.e. 'Amaretto Disaronno')


1. Pour 8 tbsp boiling water over the coffee and let it brew. The coffee extract should be strong and smell like roasted coffee. If you need to, you can add a teaspoon or two of an instant coffee. Set aside to cool down.

2. Put the plug into the sink hole and pour some cold water into it.

3. Beat the eggs with sugar in a non-metallic bowl over the pan with simmering water, until pale and smooth. Make sure all the sugar has dissolved. For this dip the tip of a wooden spoon into the mixture, take it out and run your finger over the coating. You should not feel any sugar granules. Still mixing put the bowl into the cold water bath in the sink (make sure it's not too much, so it doesn't get into the bowl). Continue to mix with the whisk until cools down slightly. Leave it there to cool completely.

3. Weigh in the butter into a TM bowl, mix it 20 seconds/Speed 3 until smooth

4. Insert the Butterfly Whisk. Add the egg mixture. Mix together on Speed 3 for about 1 minute. When combined, add the coffee and alcohol. Mix all together on Speed 3 until combined (about another 1 minute).

The mixture should be light beige in colour.

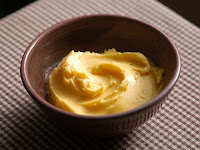
Homemade butter

(from Fast and Easy Cooking Cookbook)


Ingredients:

250g - 1000g double cream, cold
Sea salt (optional)
Herbs (optional)

1. Add double cream. Whip at Speed 5 until the butter separates from the buttermilk, stopping to scrape down the sides of TM bowl if necessary.

2. Strain through the internal steaming basket over a bowl, reserving the buttermilk for baking - it makes lovely scones.

3. Place the butter back into the TM bowl. Add 500g cold water. Mix 10 seconds/Speed 4 to wash the butter. Strain and form the butter into a log, gently squeezing out all the water. Wrap in greaseproof paper and chill in the fridge.


Variations: 1. Add salt or sea salt to taste. 2. Mince herbs and/or garlic and mix into butter. 3. Add lemon or lime zest and mix into butter.


The Cooking Monster's Tip: I use the Butterfly Whisk in option 1, I find it works better.

Monday 20 June 2011

My mum's baked cheesecake

As promised... :) Now, for this recipe, I really suggest you visit a Polish Deli nearby (I bet there is one!) to get your ingredients. There is just something unique about the taste and smell of the polish 'curd' like cheese (biaƂy ser) and you can also pick up a pack of vanilla "budyƄ", which is a type of an instant Polish dessert and really essential for this recipe. If you cannot get it, try to substitute it with some custard powder.


Ingredients:


Pic. 1
1kg biaƂy ser (curd cheese) - in the Polish Deli you could get 1kg bucket of different brands but looking similar to the one on the photograph (pic. 1)

1 pack (35g) of vanilla budyƄ (pic. 2), again if not available use 35g of powder custard

6 eggs, separated yolks from whites


Pic. 2
125g butter, melted

300g sugar

candied lemon peel

sultanas

vanilla extract


Pre-heat the oven to 180'C / gas mark 4. Grease a large baking tin (25-27 cm) with butter and generously coat the inside (bottom and the sides) with some fine breadcrumbs or flour.

1. Insert the Butterfly Whisk into TM bowl, add all 6 yolks and sugar and blend together until pale (2minutes / Speed 3)

2. Remove the Butterfly Whisk, add melted butter, cheese, 'budyƄ' powder, handfull of sultanas (or two!), handfull of lemon peel, few drops of vanilla extract. Mix until well combined (3 minutes/Speed 5)

3. Spoon out all ingredients into a large bowl and clean the TM bowl and wipe until perfectly dry

4. Insert the Butterfly Whisk into TM bowl, add 6 egg whites with a pinch of salt.  Whisk for 6 minues / Speed 3,5


5. Spoon out a 1/4 of the whites into the cheese mixture and mix well with a wooden spoon. Next add all the remaining whites and fold in very gently with a wooden spoon from the middle of the bowl towards yourself, every time turning the bowl a little. Don't mix up too hard, you don't want to loose the air you have created.

6. Bake 40-60 minutes, depends on the oven. Don't relay on a skewer test, as this cake is very moist and it will always coat it. Instead look out for the cake to come off the sides of the baking tin and its golden colour. When ready switch the oven off and leave the cheesecake in there with the door shut until cools down slightly. This will help it to settle.


Sunday 19 June 2011

What is patriotism but the love of the food one ate as a child? ~Lin Yutang

Someone once said  "Childhood is measured out by sounds and smells and sights...". When I go back in my memories, for some reason what I mostly remember is the food I have tasted for the first time and the feelings that came with it.  

I can remember the taste of fresh, still warm bread, straight from the bakery, with some butter on it, that my Grandmother was giving me in hope I will finally eat something.. And I remember (I must have been about 3 years old), that I felt happy and that its taste was incredible, and I just couldn't stop eating it, and kept asking for more, by which I was making my Grandma very pleased.

I remember, when I was about 13, I was on holidays with my mum in a beautiful Polish Baltic side town - Dziwnowek.. One day we bought some freshly baked and still hot sponge cake with plums and crumble on the top and ate it for breakfast (how naughty!) with some cold milk. Would you believe I can still taste it..


I remember the taste of the strawberries from my Grandad's allotment, eaten straight from the bushes, not washed (who had the time!), so sweet and juicy.

I must say, I can pinpoint my favourite dishes to each of the ladies in my family and still remember the taste of them - my Grandmother's dumplings with potato, cheese and onion filling (Ruskie pierogi!), my mum's.., well pretty much everything, but the memory of her scrambled eggs and cup of cocoa makes me want to go back in time and my favourite as a child very Polish "kopytka", my auntie's veal tenderloin in sauce with mash potatoes or beloved by us as kids radish and spring onions with salt in cream for breakfast.. Yummy :)

I hope that my daughter will be able in years to come taste some foods so good, that the memory of them will stay with her forever. And in her adult life, she will remember them as part of her childhood and whenever she comes over to visit, she will want to cuddle up to me and whisper.. "Mummy, please make me my favourite... Nobody can make it they way you do."


Because the memory is a way of holding onto the things you love, the things you are, the things you never want to lose.

"Ruskie pierogi" - potato, cheese and onion filled dumplings

Dumplings:

2 1/2 TM cup warm water
1 egg
2 tbsp oil
560g plain flour

Filling:

600g boiled, cooled potatoes
500g curd cheese
1 onion
salt, black pepper


1. Add all dumplings ingredients into the TM bowl in the order stated above. Mix into a firm dough (1min/Mixtopf geschlossen/Teigstufe)

2. Turn out the dough onto a lightly floured surface and roll out until it reaches about 5mm in thickness. Using a 3,5 inches diameter circle cookie cutter or top side of a glass cut out the circles as close to each other as possible to avoid the waste of a dough. Remove the cut out circles aside and from the remaining dough form a bowl, roll out again and cut out the circles again. Repeat until all dough has been used. Flour the circles lightly and cover with a clean tea towel until ready to use. Make sure they don't lay on the top of each other.


3. Add the onions into the TM bowl and chop (5seconds/Speed 4). Heat the oil in a pan. Spoon out the onions onto the hot oil and fry until translucent.

4. Weigh the potatoes into a TM bowl and finely mince (4seconds/Speed 4).

5. Add the cheese, fried onions, salt and black pepper to taste. Put the lid on and insert the spatula through the hole. Hold the spatula and mix it setting the TM for 30seconds/Speed 3-3,5.

6. Spoon out the filling onto the dough circles (about a teaspoon onto each) and seal together, either using the special tool or by hand, making sure the filling is sealed well inside.


7. Boil the water in a big pan and salt it well. Put the dumplings in the batches (not too many at once). Gently stir them in the water. Keep the heat up high. When the dumplings swim up to the top, turn the heat to a medium and boil for another 3 minutes. Spoon out of the pan onto a plate, arranging them next to each other, not on the top, as they will glue together. Put the heat up again and when starts to boil, put the next batch in.

Cooking Monster's Tip: The best are served hot scattered with fried onions and/or small bits of becon fried until brown. And for the ones who don't need to diet, we suggest to pour some fat over the dumplings too.

Sponge cake with plums and crumble

This may not be the quickest cake to make, but as they say "something worth having is something worth waiting for"... And the smell of this cake baking is fantastic.

Ingredients:

500g plain flour
40g fresh yeast or 20g instant yeast
about 1/4l milk in room temperature
2 egg yolks
100-150g caster sugar
salt
100g butter, melted
candied lemon peel or peel of one lemon finely chopped
vanilla extract
700g halved plums with the stones removed or other fruit of choice, i.e. sliced rhubarb, wedges of cored apples, halved strawberries, wedges of peaches, etc

For the crumble

50g butter
80g flour
50g caster sugar
A few drops of vanilla extract or a tsp of vanilla sugar

grind cinnamon
icing sugar to decorate

1. Put flour in a non-metallic bowl and warm up in the microwave for 20sec (this will help the yeast mix to develop quicker)

2. In a separate bowl mix the yeast with 1tbsp of sugar and 100g flour. Add to it so much of the milk, so the mix has a 'double cream' consistency (a bit thicker than custard). Cover the bowl with some oiled cling film and put aside in warm place to develop and raise.

Cooking Monster's Tip: If using fresh yeast make sure you mix it well with the sugar first, breaking the yeast well, before adding the flour and milk to it.
For the raising, I find the best place inside my top grill/oven which is above the  main oven warming up at gas mark 6 or equivalent. If you don't have this facility, you can use an airing cupboard, or put it by the radiator.

3. When the yeast mix has risen, start making the cake! Put the sugar in TM bowl and grind (25sec/Speed 10)

4. Insert the Butterfly Whisk.  Turn the blades at Speed 3 and add the egg yolks one at the time mixing well after each, and mix together until pale (about 2 minutes)

5. Stop the blades, remove the Butterfly Whisk,  add the yeast mix, the remaining flour, the rest of the milk, pinch of salt, lemon peel and few drops of vanilla extract. Set the TM to mix it together (Mixtopf geschlossen/Teigstufe) until well combined. You want the dough to be smooth, shiny and create the bubbles of air on the top.

6. When it reaches the desired look, add the melted butter a little bit at the time and keep mixing at the Mixtopf geschlossen/Teigstufesetting, to make it fluffy.

7. Scrape the dough out of the TM bowl into a clean bowl, smooth the top, cover first with oiled cling film and a kitchen towel on the top and put aside in a warm place to rise. This might take anything from 1-2 hours, depending on how warm the place is and the condition of the yeast mixture.

8. Grease and lightly flour a large, square baking tray (ideally pick the one with 3 sides, if you can get it). Melt a little bit of butter in a bowl and set aside to cool down a little bit. When the dough doubles in size, drop it onto the baking tray. Dip your fingertips in the melted butter and stretch the dough evenly across the whole baking tray. Smooth the top. Arrange the chosen fruit (I must admit, the plums are my favourite choice by far!), on the top of the whole dough, skin side up.

9. Turn the oven on a very low temperature (50°C/gas 1) and put the prepared cake into the oven, keep the door slightly open and let it raise for 15-20 minutes.

10. During the raising time prepare the crumble. Weigh the flour and butter into TM bowl. Turbo pulse until crumbs. Add sugar and vanilla. Turbo pulse a few more times to mix.

11. When the cake is ready to bake, evenly cover it with the crumble, and sprinkle with the cinnamon. Turn the oven up to 180°C-190°C and bake 30-40 minutes.

When done, remove from the oven, still warm slide out of the baking tray  (with a help of a pallet knife) onto a cooling rack or wooden chopping board and let it cool. Sprinkle with icing sugar and cut into squares 6x6 cm.

ENJOY!